Translations;
Ocelot ve Keycloak'i birlikte kullanarak API Gateway'den Mikroservis güvenliğini nasıl sağlarız?How to use Ocelot and Keycloak together to secure Microservices from API Gateway
In the dynamic landscape of microservices architecture, the need for robust security has become much more important. As organizations break down their applications into smaller, independently deployable services, ensuring the integrity and confidentiality of data exchanged between these services becomes a critical concern.
In this blog post, we will explore a comprehensive solution for securing microservices using Ocelot, an API Gateway with Keycloak, a powerful open-source identity and access management solution. By placing Keycloak behind the API Gateway, we’ll delve into how this integration safeguards resources, authenticates requests to other services, and authorizes access using claims, offering a seamless and secure communication framework for your microservices ecosystem. Let’s get started.
Create Keycloak instance⌗
Running keycloak within Docker is very easy. Just place this Dockerfile in /Identity directory in your project. You can find all of the codes in my repository from end of the post.
FROM quay.io/keycloak/keycloak:latest as builder

# Enable health and metrics support
ENV KC_HEALTH_ENABLED=true
ENV KC_METRICS_ENABLED=true

# Configure a database vendor
ENV KC_DB=postgres

WORKDIR /opt/keycloak
# for demonstration purposes only, please make sure to use proper certificates in production instead
RUN keytool -genkeypair -storepass password -storetype PKCS12 -keyalg RSA -keysize 2048 -dname "CN=server" -alias server -ext "SAN:c=DNS:localhost,IP:127.0.0.1" -keystore conf/server.keystore
RUN /opt/keycloak/bin/kc.sh build

FROM quay.io/keycloak/keycloak:latest
COPY --from=builder /opt/keycloak/ /opt/keycloak/

# change these values to point to a running postgres instance
ENTRYPOINT ["/opt/keycloak/bin/kc.sh"]
And create docker-compose.yml file that access /Identity/Dockerfile and builds image from it. We can use base image rather than custom Dockerfile but with this approach you can customize much more features of Keycloak like frontend theme and secret keys.
version: "3"

services:
  # PostgreSQL for keycloak
  secured-identity-db:
    container_name: secured-identity-db
    image: postgres:16-alpine
    ports:
      - 6063:5432
    expose:
      - 6063
    volumes:
      - ./data/secured-identity-db:/var/lib/postgresql/data
    restart: always
    environment:
      - POSTGRES_PASSWORD=myStrongPassword123
      - POSTGRES_USER=keycloak
      - POSTGRES_DB=keycloak
    networks:
      - secured-network

  # Keycloak
  secured-identity:
    container_name: secured-identity
    build: ./Keycloak
    command: ["start-dev"]
    ports:
      - 5053:8080
    expose:
      - 5053
    environment:
      - KEYCLOAK_ADMIN=admin
      - KEYCLOAK_ADMIN_PASSWORD=admin
      - KC_HOSTNAME_URL=http://localhost:5050/identity
      - KC_DB=postgres
      - KC_DB_USERNAME=keycloak
      - KC_DB_PASSWORD=myStrongPassword123
      - KC_DB_URL=jdbc:postgresql://secured-identity-db:5432/keycloak
    depends_on:
      - secured-identity-db
    networks:
      - secured-network

networks:
  secured-network:
    driver: bridge

volumes:
  secured-data:
    driver: local
And we just need to run docker from this docker-compose.yml file.
docker compose build
docker compose up -d
Put keycloak behind Ocelot API Gateway to protect resources⌗
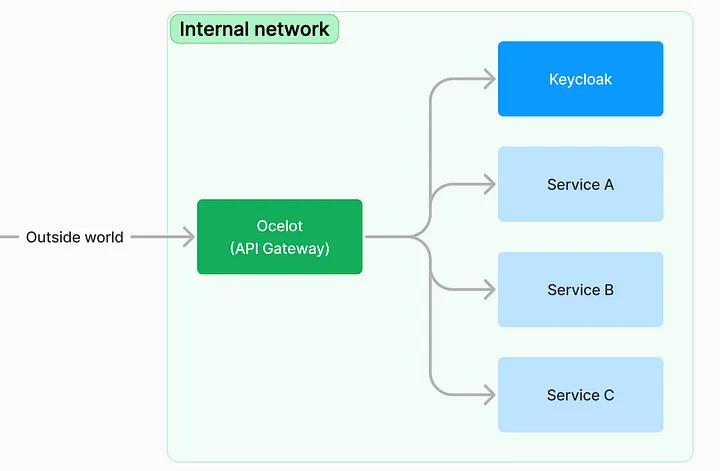
Microservice architecture with Ocelot and Keycloak
It is important to secure your identity service (keycloak) and reduce the attack vector by limiting the endpoints that can receive requests like other services. Keycloak admin panel should not be accessed from an external network, only people on this network can access this feature. For further readings consider visit Keycloak documentation about Using a reverse proxy.
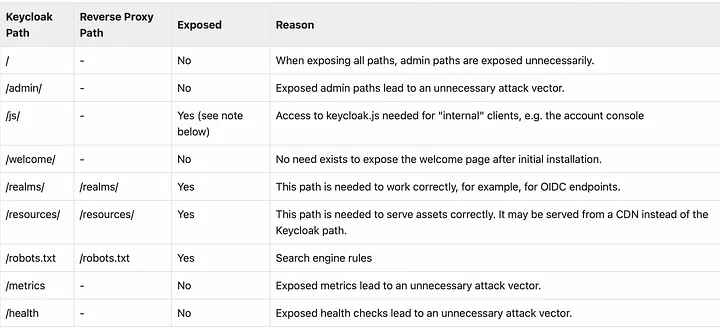
Exposed path recommendations
First, let’s create Ocelot project. I use Dotnet 8
dotnet new sln -n Secured
dotnet new webapi -o Secured.ApiGateway
cd Secured.ApiGateway/
dotnet add package Ocelot --version 22.0.1
After we successfully created the project, modify Program.cs as follows and create ocelot.json file in root directory.
var builder = WebApplication.CreateBuilder(args);

builder.Configuration.AddJsonFile("ocelot.json", optional: false, reloadOnChange: true);

builder.Services.AddOcelot(builder.Configuration);

var app = builder.Build();

await app.UseOcelot();
await app.RunAsync();
After that, we can use this ocelot.json file to limit access to our keycloak application running on localhost:5053.
{
  "Routes": [
    {
      "DownstreamPathTemplate": "/realms/{everything}",
      "DownstreamScheme": "http",
      "DownstreamHostAndPorts": [
        {
          "Host": "localhost",
          "Port": 5053
        }
      ],
      "UpstreamPathTemplate": "/identity/realms/{everything}",
      "UpstreamHttpMethod": [ "Get", "Post", "Put", "Delete" ]
    },
    {
      "DownstreamPathTemplate": "/resources/{everything}",
      "DownstreamScheme": "http",
      "DownstreamHostAndPorts": [
        {
          "Host": "localhost",
          "Port": 5053
        }
      ],
      "UpstreamPathTemplate": "/identity/resources/{everything}",
      "UpstreamHttpMethod": [ "Get" ]
    },
    {
      "DownstreamPathTemplate": "/js/{everything}",
      "DownstreamScheme": "http",
      "DownstreamHostAndPorts": [
        {
          "Host": "localhost",
          "Port": 5053
        }
      ],
      "UpstreamPathTemplate": "/identity/js/{everything}",
      "UpstreamHttpMethod": [ "Get" ]
    }
  ],
  "GlobalConfiguration": {
    "BaseUrl": "https://localhost:5050"
  }
}
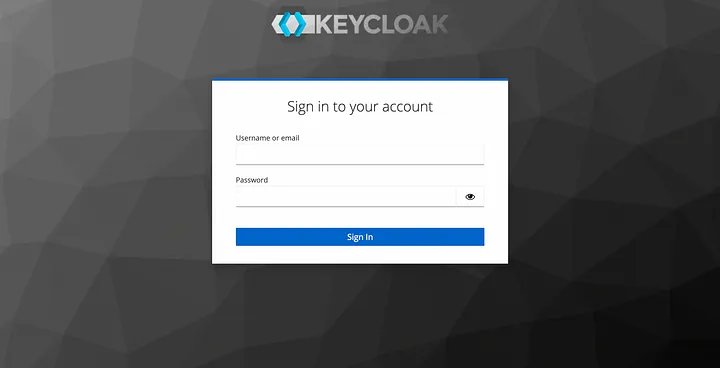
After this configurations you can access keycloak from localhost:5050 that is the API Gateway’s address. After these configurations, you can access keycloak from localhost:5050, which is the address of the API Gateway, but you will not be able to access the Keycloak admin panel through this address because we have limited access.
For making our Keycloak configurations, we can log in to the admin panel at the keycloak address that is still accessible locally, that is, localhost:5053. Note that in the deployment scenario, we will ensure that only Ocelot has access to the external internet.
In localhost:5053 we can enter admin for username and admin for password. We can change this credentials from docker-compose.yml file.
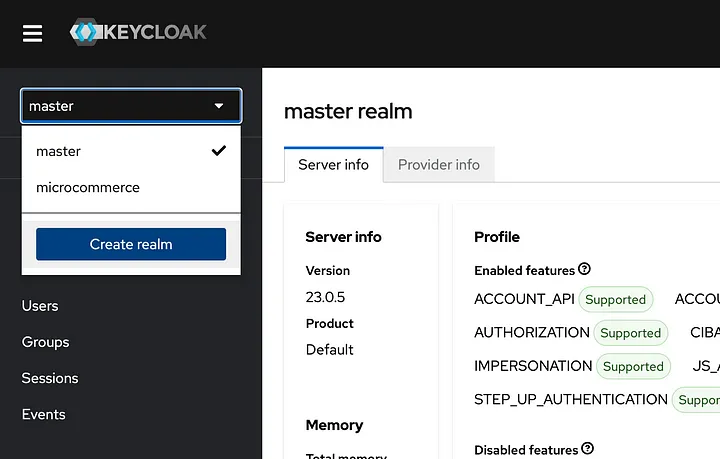
After logged in we create new realm for managing users and client for our application from this dropdown menu. After clicking the Create realm button, simply enter the secured as the realm name and leave everything as is.
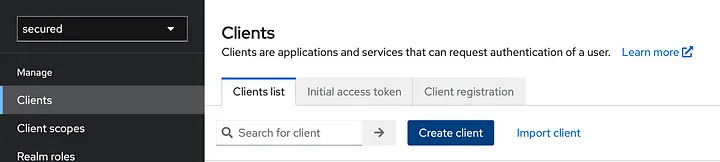
In clients tab click Create client. name Client ID as postman and valid redirect uri as https://oauth.pstmn.io/v1/callback. leave other things as is.
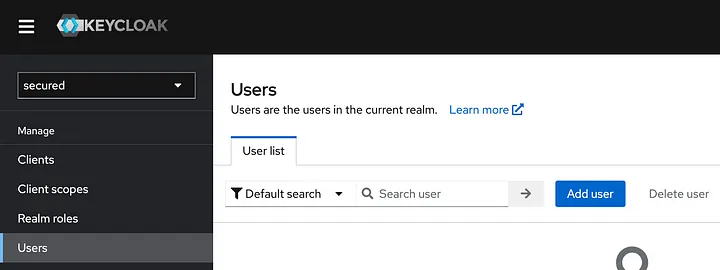
In the users tab, add users to log in to Keycloak.
After these steps we can login to our keycloak with newly created user to get access token. For accessing API gateway I use Postman. In postman you can logged in with Keycloak. In Authorization section select OAuth 2.0 and configure as follows and click Get New Access Token. Postman will open browser window and redirect you to Keycloak login page, enter credentials for your new user. Don’t enter admin credentials, this credentials only valid in master realm.
Grant type: Authorization code
Auth URL: http://localhost:5050/identity/realms/secured/protocol/openid-connect/auth
Access Token URL: http://localhost:5050/identity/realms/secured/protocol/openid-connect/token
Client ID: postman
Scope: openid profile roles
If you did everything right, you have successfully authenticated using Postaman with Keycloak behind the API Gateway 🎉
Authenticate requests to other services⌗
If you want to authenticate a request in Ocelot, make the following updates to Program.cs and ocelot.json. MetadataAddress gets the keys required for JWT validation. However, if you want to avoid extra network calls, you can place the keys in the appsettings.json file and use them.
Authentication completed with AuthenticationOptions in ocelot.json file, here we say that we will send our JWT token along with the Bearer prefix and JWT token validation done with configuration from Program.cs
var builder = WebApplication.CreateBuilder(args);

builder.Services
    .AddAuthentication(JwtBearerDefaults.AuthenticationScheme)
    .AddJwtBearer(JwtBearerDefaults.AuthenticationScheme, o =>
    {
        o.MetadataAddress = "http://localhost:5050/identity/realms/secured/.well-known/openid-configuration";
        o.RequireHttpsMetadata = false;
        o.Authority = "http://localhost:5050/realms/secured";
        o.Audience = "account";
    });

builder.Configuration.AddJsonFile("ocelot.json", optional: false, reloadOnChange: true);


builder.Services.AddOcelot(builder.Configuration);

var app = builder.Build();

app.UseAuthentication();
app.UseAuthorization();

await app.UseOcelot();
await app.RunAsync();
{
    "Routes": [
      {
        "DownstreamPathTemplate": "/get",
        "DownstreamScheme": "https",
        "DownstreamHostAndPorts": [
          {
            "Host": "httpbin.org",
            "Port": 443
          }
        ],
        "UpstreamPathTemplate": "/test",
        "UpstreamHttpMethod": [ "Get" ],
        "AuthenticationOptions": {
          "AuthenticationProviderKey": "Bearer"
        }
      },

//...
Authorize requests to other services⌗
Authorization is slightly more difficult and requires additional work because Keycloak place user roles in nested form in JWT payload. It is something like following. As you can see roles field is placed under realm_access field. This creates confusion in Ocelot, because Ocelot reads claims as string or object values and does not evaluate nested fields. To avoid this problem we configure Keycloak token mapper and don’t use nested form.
{
  //...
  "exp": 1706600524,
  "realm_access": {
    "roles": [
      "offline_access",
      "default-roles-microcommerce",
      "uma_authorization",
      "customer"
    ]
  },
  "resource_access": {
    "account": {
      "roles": [
        "manage-account",
        "manage-account-links",
        "view-profile"
      ]
    }
  },
  "scope": "openid email profile",
  "preferred_username": "berkslv",
}
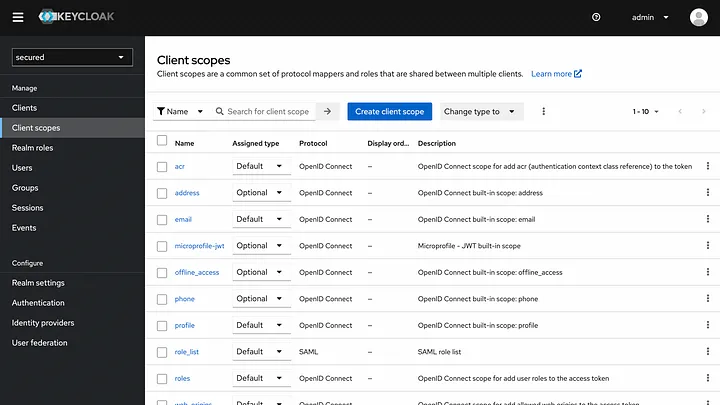
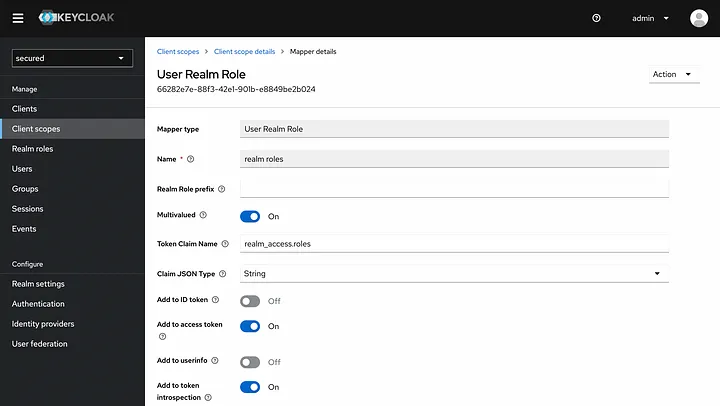
For this custom mapping, click Client scopes from left menu and select roles.
Under the roles, select Mappers section and then click realm roles.
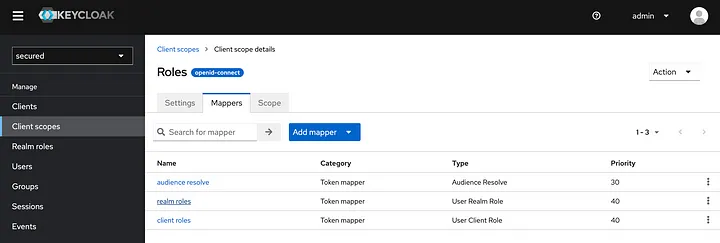
In the menu that opens, realm_access.roles is entered in the Token Claim Name option. We update this to realm_roles.
After making these configurations, we update our token by logging in again via Postman. We make the following update in the ocelot.json file so that the requests we make with the updated token are subject to claim control by Ocelot. If we don’t have customer role in our user we get 403 response. You can create and assing your custom roles in Keycloak admin panel.
{
    "Routes": [
      {
        "DownstreamPathTemplate": "/get",
        "DownstreamScheme": "https",
        "DownstreamHostAndPorts": [
          {
            "Host": "httpbin.org",
            "Port": 443
          }
        ],
        "UpstreamPathTemplate": "/test",
        "UpstreamHttpMethod": [ "Get" ],
        "AuthenticationOptions": {
          "AuthenticationProviderKey": "Bearer"
        },
        "RouteClaimsRequirement": {
          "realm_roles": "customer"
        }
      },

//...
If you want to access the source code, you can find the whole project on my GitHub account:
GitHub - berkslv/lecture-ocelot-and-keycloak
Conclusion⌗
Thank you for reading! 🎉 In order not to miss my research in the field of software development, you can follow me at @berkslv.